i
255 South Taylor Avenue Louisville, Co 80027 U.S.A Tel: 303-4952260x116 E-mail: sales@boulderamp.com Web: www.boulderamp.com
Boulder Ampliers, Inc.
255 S. Taylor Avenue
Louisville, CO 80027
(303) 449-8220, x110
www.boulderamp.com
BoulderAmpliersInc
@boulderampliers
@BoulderAmps
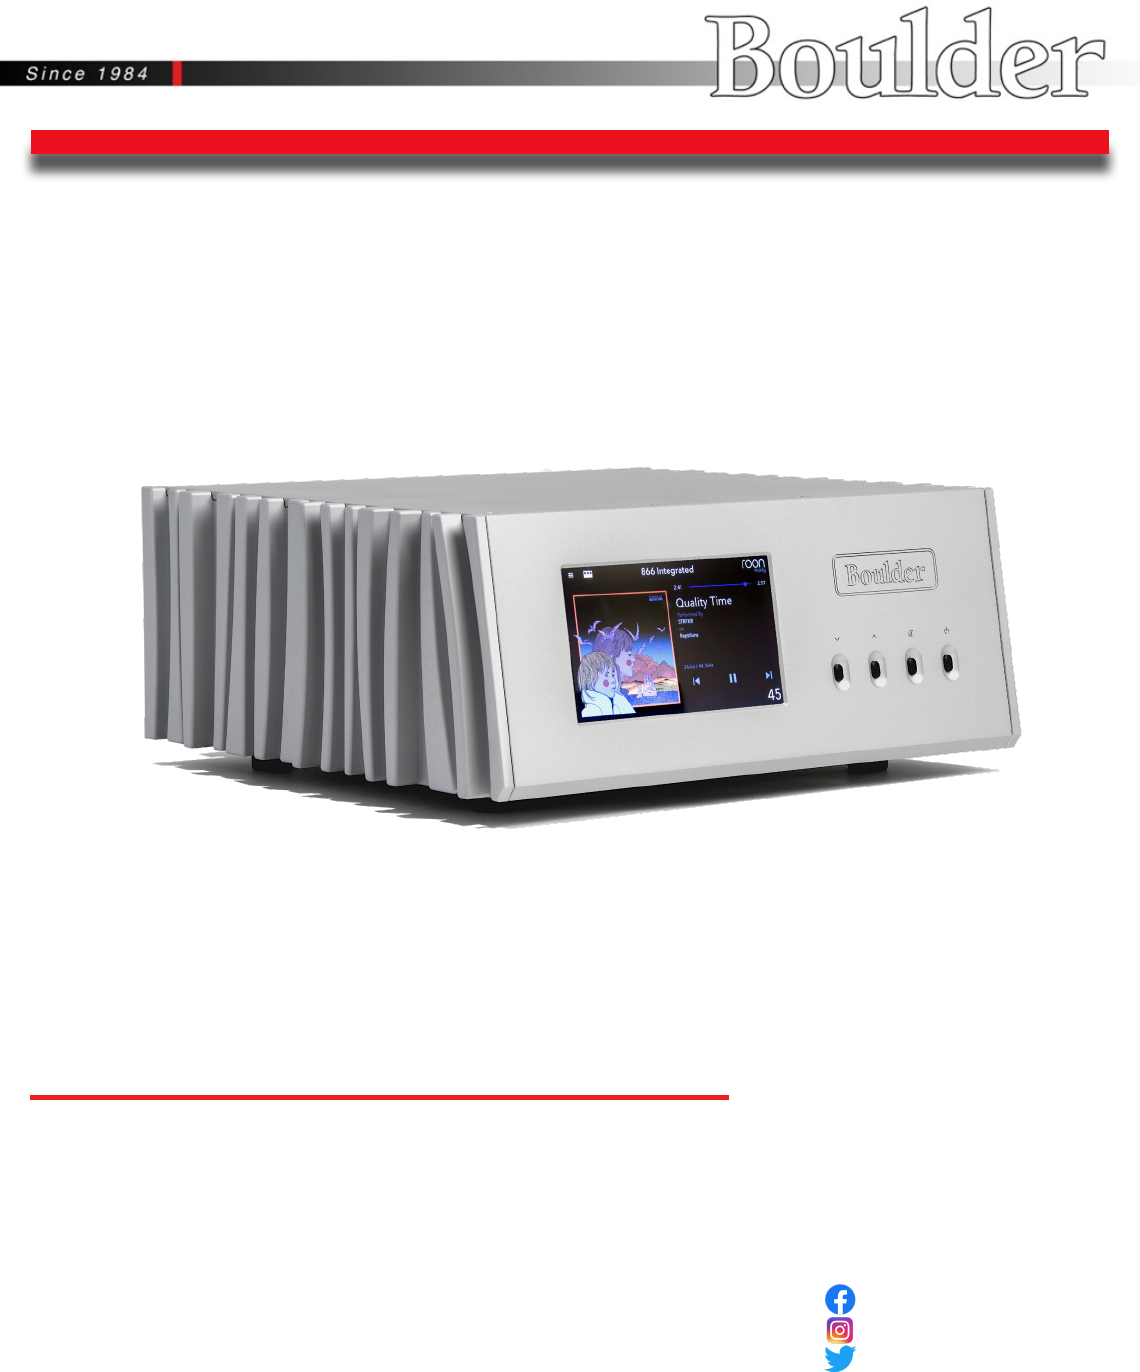
866 Integrated

1-1
About Boulder Ampliers, Inc.
Boulder was founded in 1984 and is the last high-performance audio manufacturer operating
in North America to still perform all of its own design, engineering and manufacturing in-
house. While this form of production may be more costly than outsourcing, the resulting quality
control and reliability of the nished products are never compromised.
In 2016, Boulder moved into a new, purpose-built production facility to increase manufacturing
eciency and oer space for expansion to meet the needs of future growth.

2-2
Congratulations and thank you for selecting the Boulder 866 Integrated for your high-
performance sound system. We are certain it will provide you with many years of listening
pleasure.
e 866 represents the concerted eorts of numerous Boulder designers, engineers, and
technicians working to bring you the best audio playback components in the world. Please take
a few minutes to read through this instruction manual prior to using your 866. is will help
you understand the many functions and capabilities of the preamplier. It will also allow you to
maximize the convenience and performance for which it was engineered.
Your Boulder 866 Integrated has undergone extensive laboratory tests for safety, functionality
and technical excellence. In addition, it has been individually subjected to rigorous listening
trials in our sound room utilizing a wide range of musical material. No product ever leaves our
factory until we are totally satised that it achieves its full potential.

2-3
Table of Contents
About - - - - - - - - - - - - - - - - - - - - - - - - 1-1
ank You - - - - - - - - - - - - - - - - - - - - - - 2-2
Introduction - - - - - - - - - - - - - - - - - - - - - - 3-6
Analog Features: . . . . . . . . . . . . . . . . . . . 3-6
Digital Features: . . . . . . . . . . . . . . . . . . . 3-6
Operational Features: . . . . . . . . . . . . . . . . . . 3-6
Unpacking and Care . . . . . . . . . . . . . . . . . . 3-7
Before You Start . . . . . . . . . . . . . . . . . . . 3-7
How to Clean the Casework . . . . . . . . . . . . . . . 3-8
Placement and Installation . . . . . . . . . . . . . . . . 3-9
Connections - - - - - - - - - - - - - - - - - - - - - 4-10
Connecting the Analog Inputs . . . . . . . . . . . . . . . 4-10
Connecting to an Unbalanced Analog Source . . . . . . . . . . 4-11
Connecting the Digital Inputs: . . . . . . . . . . . . . . . 4-12
Connection to AC Mains . . . . . . . . . . . . . . . . 4-13
Connecting the 866 to a Home Network . . . . . . . . . . . 4-15
Connecting an Apple or Android Mobile Device to the 866 . . . . . 4-16
Connecting the 866 Internal Network to Home Network (Wireless) . . 4-17

2-4
Operation - - - - - - - - - - - - - - - - - - - - - - 5-19
Front Panel Controls and Screen Modes . . . . . . . . . . . 5-19
Front Panel Buttons . . . . . . . . . . . . . . . . . . 5-20
Volume . . . . . . . . . . . . . . . . . . . . . . 5-21
Mute . . . . . . . . . . . . . . . . . . . . . . . 5-22
Standby . . . . . . . . . . . . . . . . . . . . . . 5-23
Touch-Screen Functions: Home Screen . . . . . . . . . . . . 5-24
Setup . . . . . . . . . . . . . . . . . . . . . . . 5-25
Volume Options . . . . . . . . . . . . . . . . . . . 5-25
Volume Type . . . . . . . . . . . . . . . . . . . . . 5-25
Max Volume . . . . . . . . . . . . . . . . . . . . . 5-26
Mute Level . . . . . . . . . . . . . . . . . . . . . 5-27
Input Settings . . . . . . . . . . . . . . . . . . . . 5-28
Input Trim . . . . . . . . . . . . . . . . . . . . . 5-28
eater Mode . . . . . . . . . . . . . . . . . . . . 5-29
Input Image . . . . . . . . . . . . . . . . . . . . . 5-30
Display Settings . . . . . . . . . . . . . . . . . . . . 5-31
System Settings . . . . . . . . . . . . . . . . . . . . 5-32
Network Settings . . . . . . . . . . . . . . . . . . . 5-32
Factory Defaults . . . . . . . . . . . . . . . . . . . 5-34
Input Defaults . . . . . . . . . . . . . . . . . . . . 5-35
Updating the Firmware of the 866 . . . . . . . . . . . . . 5-36

2-5
Roon - - - - - - - - - - - - - - - - - - - - - - - 5-37
What is Roon? . . . . . . . . . . . . . . . . . . . . 5-37
Connecting to Roon on 866 . . . . . . . . . . . . . . . . 5-37
Using Boulder Control App with Roon . . . . . . . . . . . . 5-37
UPnP & Airplay Operation - - - - - - - - - - - - - - - - 5-38
What is UPnP? . . . . . . . . . . . . . . . . . . . . 5-38
How to Use UPnP with the 866 . . . . . . . . . . . . . . 5-38
Air-Play Functionality . . . . . . . . . . . . . . . . . 5-38
Programming - - - - - - - - - - - - - - - - - - - - 6-39
Web Based Programming . . . . . . . . . . . . . . . . 6-39
Boulder Net . . . . . . . . . . . . . . . . . . . . . 6-40
Appendix - - - - - - - - - - - - - - - - - - - - - - 7-41
Technical Specications . . . . . . . . . . . . . . . . . 7-41
Weights and Dimensions . . . . . . . . . . . . . . . . 7-42
866 Integrated Dimensions . . . . . . . . . . . . . . . . 7-43
Troubleshooting . . . . . . . . . . . . . . . . . . . 7-44
Notes: . . . . . . . . . . . . . . . . . . . . . . . 7-45

3-6
e 866 Integrated embodies years of development and is one of the most advanced integrated
ampliers available. Here are some of the features that set the 866 apart from the competition:
Analog Features:
• Boulder volume attenuator.
• ree pairs of balanced inputs on XLR connectors.
• Fully-balanced audio input path.
• Low contact resistance output binding posts.
• Low power-consumption Standby mode
Digital Features:
• Boulder digital conversion system.
• Ethernet, USB Memory device, AES3, Toslink digital input connections.
• Airplay like Functionality.
• Roon™ endpoint compatibility.
Operational Features:
• Large, full-color, 7-inch LCD touch screen front panel display.
• Display shows: input source, volume, mute, setup and now playing screen.
• Sophisticated soware updates when connected to the Internet.
• Conguration capabilities.
• Boulder Control app for Android and Apple devices.
• IP control with two-way communication for external control systems.
• HTML Control and Setup page for access to additional customizable features.

3-7
Unpacking and Care
e 866 Integrated is heavy and features nely nished casework. Please use care when
unpacking, liing, and installing the integrated amplier to avoid personal injury or damage
to the casework and furniture. e 866 weighs 54 lbs. (25 kg). If possible, two people should
unpack and place it into position.
Be sure to save all packing materials! e 866 is shipped in a foam wrap to protect the
preamplier’s ne nish. Try not to damage this wrap in the event that the unit must be
transported elsewhere in the future.
Before You Start
You should have received a large, heavy box. e pieces included inside the box are:
1. 866 Integrated
2. Quick Start Guide
3. Power cord
If any of these pieces are missing or damaged, please contact your authorized Boulder dealer
immediately before continuing with the installation.

3-8
How to Clean the Casework
If the 866 must be cleaned, use only a so, lint-free cloth moistened with plain water.
Never use any type of chemical cleaner unless recommended by your dealer or the Boulder
factory.
Do not use bleach! Bleach will remove the anodized surface of the casework.
Never use any type of abrasive to clean the casework.
If you have any questions, please contact your authorized Boulder dealer.

3-9
Placement and Installation
Your Boulder 866 Integrated is designed to reduce the eects that external magnetic elds and
radio frequencies (RF) have on its circuitry. While placement is not critical, known magnetic
elds should be avoided whenever possible.
Because it is heavy, the 866 must be placed on a sturdy, stable surface.
Do not place in an enclosed rack without ventilation. e 866 must have at least 3 inches (8 cm)
of airspace around the chassis for proper cooling and airow.
Be sure to leave access to the AC mains and interconnect cables when installing the unit.
Depending on how easy it is to access the back panel of the 866, it may be wise to pre-install the
power and interconnect cables before placement.
Apperatus shall not be exposed to dripping or splashing and no objects with liquids, ie vases,
should not be placed on the apperatus.
4-10
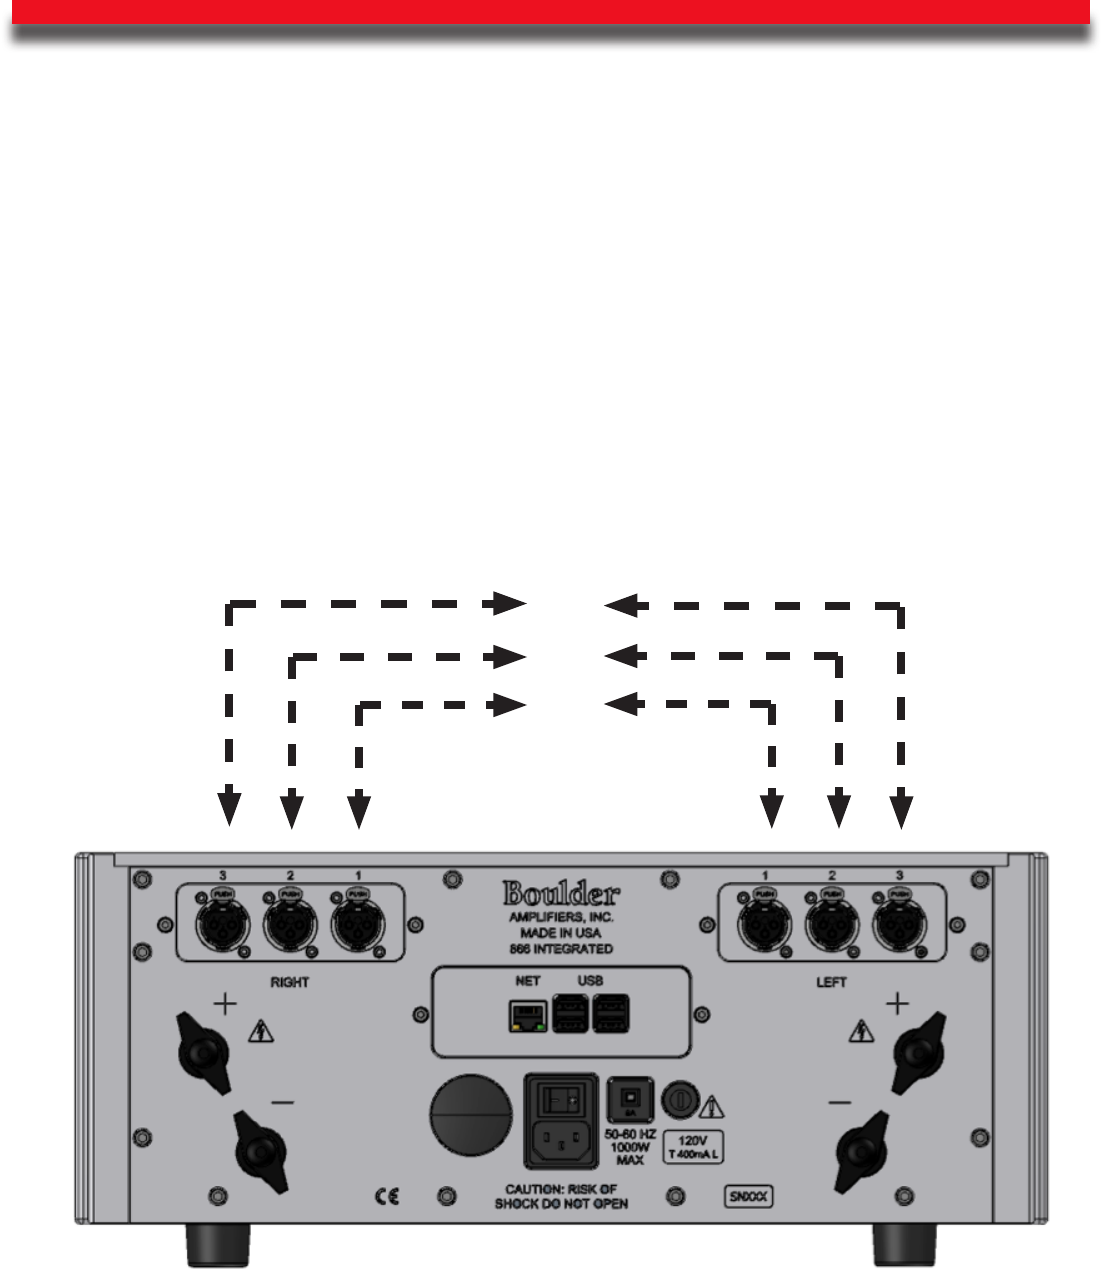
Connecting the Analog Inputs
To get started listening, you only need to connect sources to the 866 as you would any other
integrated amplier. Please take note of the following:
e 866 can be connected to many dierent types of analog sources and will provide excellent
sound quality for each. To fully realize the sonic potential of your 866 Integrated, use balanced
cable connections whenever possible. Balanced cables minimize interference from magnetic and
RF sources.
Connect each analog source to one of the three inputs provided on the rear panel of the 866.
Later, you will be able to program each input with the source’s name and photo (please see Input
Settings on page 5-30), so you may want to make a list of each source as you connect them.
Input 3
Input 2
Input 1

4-11
Connecting to an Unbalanced Analog Source
Although the inputs are all of the 3-pin XLR type, an unbalanced source can easily be
accommodated by using a special cable. is cable has an RCA type connector on the source end
and a 3-pin XLR connector for the input on the 866 Integrated end.
e negative input (pin 3) should be wired to ground only at the RCA type connector. is
brings the inverted input reference of the 866 to the unbalanced source ground, thus reducing
ground loops.
Another option for connecting unbalanced sources is the Boulder ABL2 input adapter. It
converts a balanced input into an RCA input at the rear of the 866. Like the above cable, the
negative input of the 866 is connected to the ground of the RCA connecter. However, this
negative side will then share the shield wire with the chassis ground and will not have the best
hum rejection.
4-12
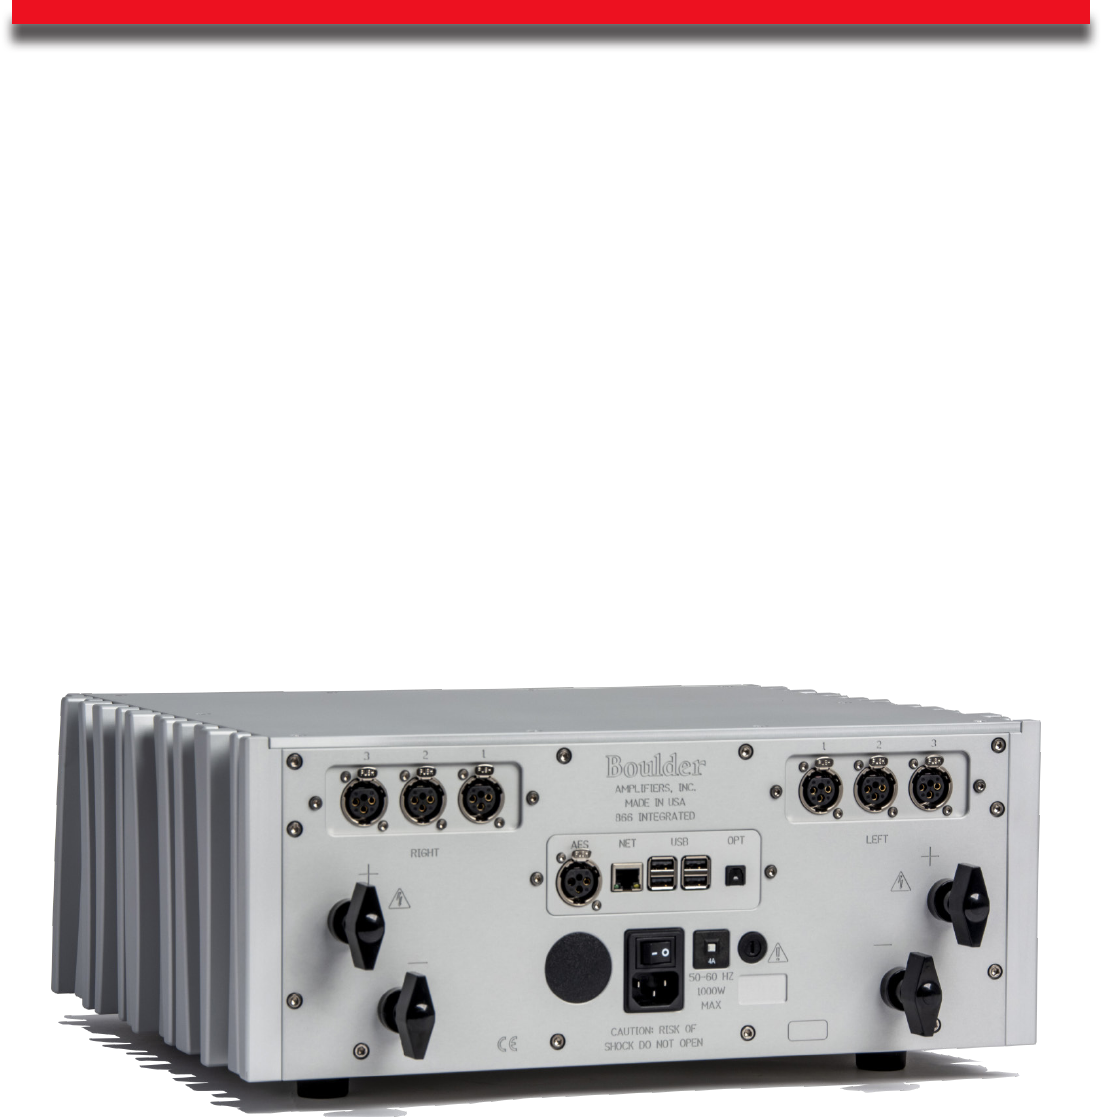
Connecting the Digital Inputs:
e analog + Digital version of the 866 includes digital inputs. Please take note of the following:
e 866 can be connected to many dierent types of digital sources and will provide excellent
sound quality for each. e 866 includes digital input connections for Toslink (optical), AES3
via 3-pin XLR (convertible to S/PDIF on RCA), USB Memory Devices and Ethernet/ Network
audio. e 866 is also a Roon endpoint, which enables it to stream from multiple audio
subscription services.
Connect each digital source to one of the digital inputs provided on the rear panel of the 866.
Later, you will be able to program each input with the source’s name and photo (please see Input
Settings on page 5-30), so you may want to make a list of each source as you connect them.
NOTE: A NAS hard drive connected to the USB inputs must be self-powered. e USB input
connections on the 866 cannot provide enough power for a NAS hard drive.
4-13
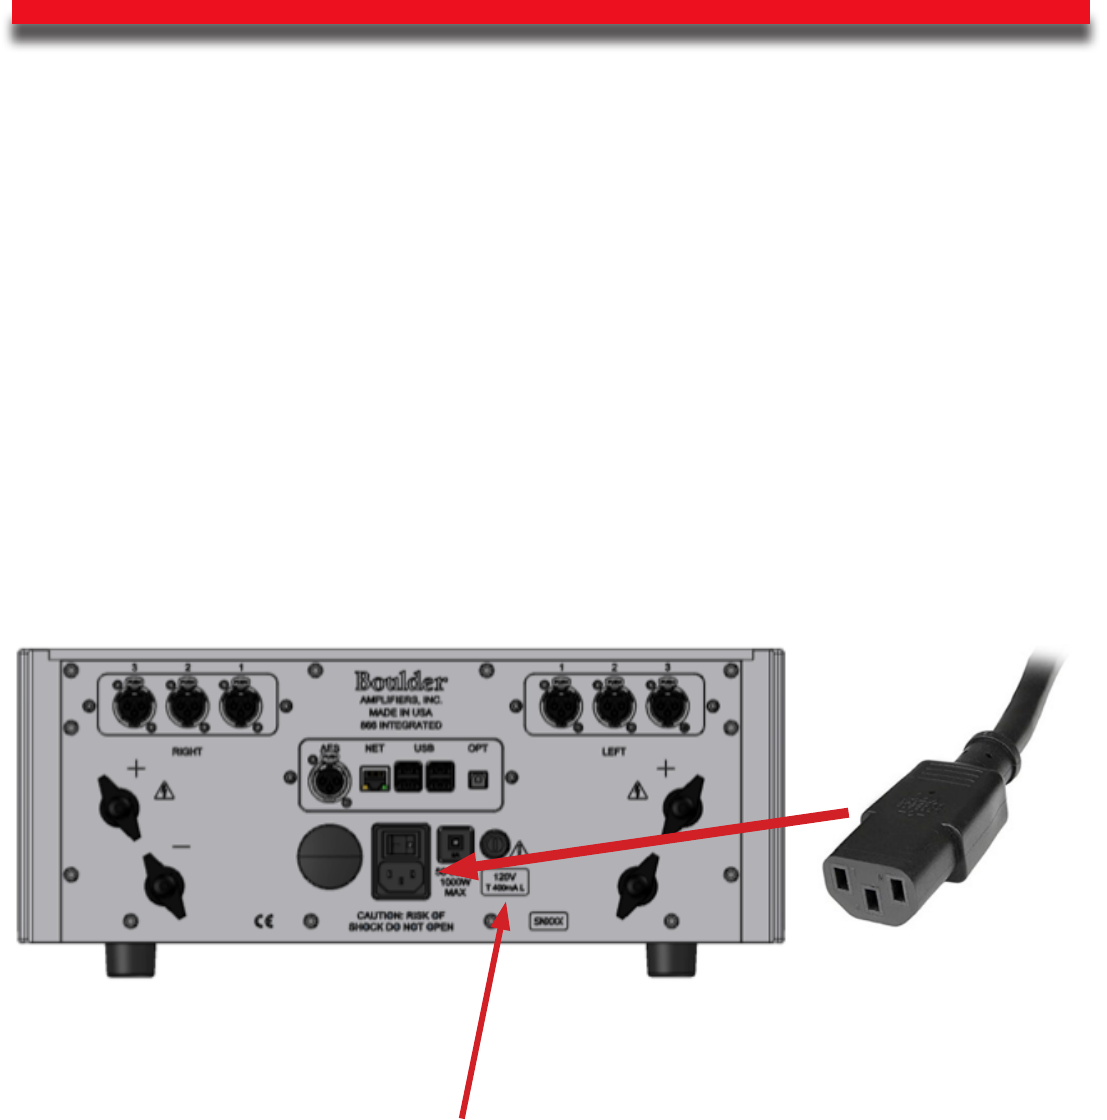
Connection to AC Mains
Connections to hazzardous live need an instructed person. is is a guide to instruct you
from getting harmed or risk of electricution. (If you are uncomfortable with hooking up your
amplier to AC mains, reach out to your local dealer)
e 866 Integrated is supplied with an AC mains power cord appropriate for the location where
it was purchased.
Connect the AC power cord to the Master AC Power Switch connection on the rear panel of the
866 as shown and plug the other end into AC mains.
NOTE: We reccomend before starting your 866 to make all your audio connections.
NOTE: Double check voltage and make sure its appropriate for what you’re plugging your 866 into.
(100V, 120V, 240V)

4-14
When connecting various sources, make a list of what component is connected to each input so
that you do not forget the order in which they are connected. You will then be able to name the
inputs on the front panel display with the Boulder Control app. is list will be very helpful at
that time.
Connections from sources such as a phono preamplier, tuner, or cable/satellite receiver can
be made to the analog input connections. Sources such as a DVD player, CD transport, music
server, or NAS drive can be made to the digital input connections.
e Ethernet connections are for network streaming via a UPnP/DLNA media server, Roon
interfacing and streaming, and Internet access to program input names or download soware
updates for the 866. e Ethernet jack should be connected to a network with an active Internet
feed.

4-15
Connecting the 866 to a Home Network
In order for the 866 to stream from media subscription services and download soware updates,
you will need to connect it to a network with an active Internet connection. If an update is
available, the 866 will notfy you when you come out of standby.
With the 866 turned OFF, connect a network cable between the 866 and your network router or
switch. Use the RJ-45 Ethernet connector marked NET on the rear panel of the 866.
Turn on the 866 and allow it to boot up. It will go into Standby when boot-up is complete. Turn
the 866 ON from the front panel with the standby button.
Connect the mobile device or tablet or device to the same network via WiFi and open the
Boulder Control app.
Once out of standby, your home network is now connected to your 866 and ready to be
controlled by the Boulder Control app, Roon app or UPnP apps.
If you are having problems with your network setup, please contact your authorized Boulder dealer.

4-16
Connecting an Apple or Android Mobile Device to the 866
e 866 can easily be controlled via a mobile device as long as the 866 and the mobile device are
on the same network and you have the Boulder Controller app. e app is available on the Apple
App Store or on the Boulder website (www.boulderamp.com) for android users. To connect your
mobile device and control the 866, follow these instructions:
1. Using a wired connection, connect the 866 to a network and then turn it ON via the AC
mains master switch on the rear panel.
2. Connect the Apple (iPhone, iPod, iPad, and/or OS X computer) or Android device to
the same network via a wired or WiFi connection.
3. Open the app on your mobile device select 866 [Your Units Serial number]
4. e “Go” button will then turn blue. Press the Go button on the app and you can
control the 866 from your mobile device.
NOTE: e 866 features its own wi network. However we strongly reccomend to use a wired
conection if possible. is will provide the most stable connection. If you must use 866 in wi mode
control will be limited.
If you are having problems connecting to your internal wi, please contact your authorized
Boulder dealer.
On the Boulder Controller app, if you are wishing to use Wi and not ethernet in your phone
settings location while using the app MUST be ON. Steps to get an 866 on a wireless network with
no ethernet is on page 4-17.

4-17
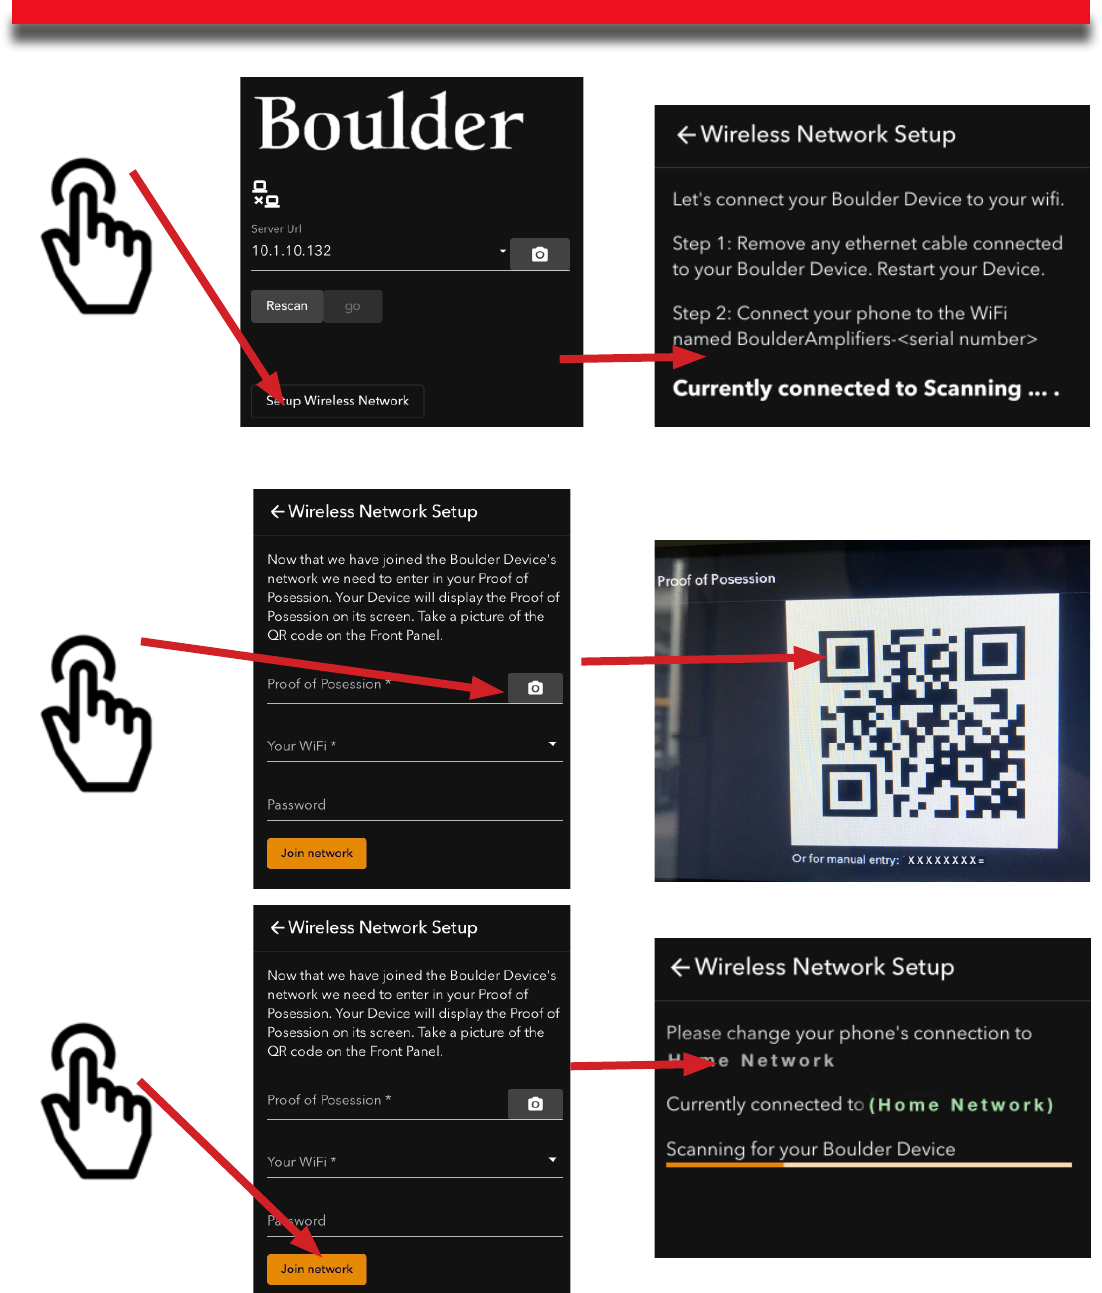
Connecting the 866 Internal Network to Home Network (Wireless)
First, start by making sure no ethernet is plugged into the unit becuase that disables the 866’s
internal network.
Next, go to the settings on your mobile device. Go to wi and connect to the 866. In the wi
dropdown it should read Boulder Ampliers-(*Serial number of unit*).
en, on your mobile device open up the Boulder controller app, near the bottom there is a
button for “Setup wireless network.” Select that. Location while using app must be on.
is should bring up a brief screen on the app that says “currently connected to scanning”
Once the 866 is connected the app will ask for “Proof of Possesion, Your Wi (Home Network),
and Password (Home Network password)
Selecting, proof of posession will pull up a QR code on the display and your mobile device can
use the camera to recognize the code. Or below the QR code on the display you will nd the
code and manually enter it into the app on your mobile device.
Note: Proof of Possesion is also found in system settings of the 866 in the network settings tab.
Select the wi you wish to conect the 866 with and enter the password for your wi.
Note: Make sure the password you enter is correct, especially with capital letters and symbols, on
Apple products the app will try to capitalize the rst letter.
Once all three are entered, a screen will tell you to switch to the home network from the internal
network of the 866. e 866 will boot down into standby since it is switching networks, take it
out of standby and you should be connected to your home network.
Note: If these steps dont work. Try again aer going to network settings and restore wi defaults. If
you still cannot connect, contact your local dealer.
(Visual display next page)
4-18

5-19
Front Panel Controls and Screen Modes
e 866 features a full-color touch-screen LCD display and four buttons on the right-hand side
of the front panel. e display and buttons will control or adjust dierent functions of the 866.
e four buttons on the front panel of the 866 are (L to R) Volume Down, Volume Up, Mute,
and Standby.

5-20
Front Panel Buttons
When the display is showing the Home Screen, the buttons will control the Volume, Mute and
Standby modes of the 866 and the touch screen will be used to select inputs. When the 866 is
in the Setup mode, the touch screen will be used to adjust programmable features of the 866’s
operation.
Pressing the Volume Up button will increase the volume and an indication such as “45.0”
will appear in the Volume portion of the display. At this point you should hear music from the
system.
Pressing the Volume Down button will decrease the volume.
Pressing the Mute button will attenuate the volume by a programmable level (please see
Settings: Mute Level on page 27).
Pressing the Standby button will turn ON or place the 866 in Standby.
CAUTION: THE VOLUME CONTROL MUST BE ADJUSTED CAREFULLY, AS IT HAS
THE ABILITY TO GET LOUD VERY QUICKLY.
WARNING: IF THE SELECTED INPUT IS PROGRAMMED FOR “THEATER MODE,”
THE VOLUME CONTROL WILL HAVE NO EFFECT. VOLUME CAN ONLY BE
CONTROLLED BY THE SURROUND SOUND PROCESSOR.

5-21
e 866 has a large, full-color display located on the le-hand side of the front panel. ere are
four buttons to control Volume Up, Volume Down, Mute, and Standby located on the right-
hand side of the front panel.
Volume
Pressing the Volume Up or Volume Down button will change the output volume level of the
866. e 866’s volume can be displayed two ways, 100 steps from 0 to 100, or in decibels from
-100 to 0. e default mode is from 0 to 100. (Please see Volume Options: Volume Type on
page 6-25)
In 0 to 100 mode, the Volume portion of the display will show “0” to indicate innite
attenuation, or no output. e volume range maximum indication is “100.”
In decibel mode, the Volume portion of the display will show “-100” to indicate innite
attenuation, or no output. e volume range maximum indication is “0” to indicate no
attenuation.
e volume can be adjusted in 100 equal steps.
Pressing the Volume Up button will increase the volume and the indicator in the bottom right
portion of the display will change to show the selected volume level. At this point you should
hear music from the system.
Pressing the Volume Down button will decrease the volume.
e Volume function will continue to operate in Mute mode as long as the volume is decreased.
Pressing the Volume Down button will decrease the volume setting even though the output will
remain muted.
Pressing the Volume Up button will immediately bring the 866 out of Mute mode.
e function of the Mute button will always remain the same, regardless of screen mode.
5-22
Mute
It is possible to Mute the 866’s outputs so that they are reduced by a preprogrammed level.
e Mute feature allows for temporary volume reduction without losing the original volume
setting. For example, engaging the Mute function will attenuate the output to a level suitable for
conversation. is level of attenuation can be adjusted in the Setup menu. e default Mute level
is -20. (Please see Settings: Mute Level on page 6-27)
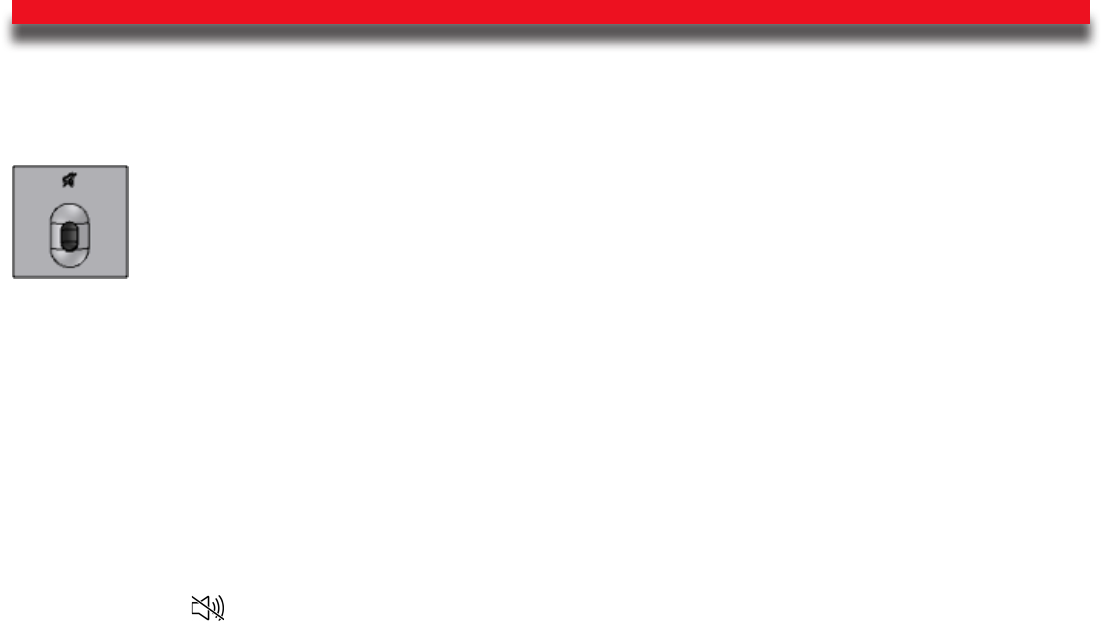
Pressing the Mute button will immediately attenuate the output and the front panel display will
show this icon:
Pressing the Mute button will immediately return the output to the original volume level and the
front panel display will show only the volume setting.
NOTE: e Mute output level is relative to the normal listening level. erefore, if the Mute
level is set to -60.0 dB, the volume will be decreased by an additional 60 dB from its current level
when “Mute” is engaged.

5-23
Standby
Pressing the Standby button will put the 866 into Standby mode. is will turn OFF all circuits
except for the logic necessary to wake it up again.
NOTE: Because the 866 greatly reduces power consumption when in Standby mode, it is only
necessary to place the unit in Standby when not in use. You do not need to turn the 866 o via the
Master AC Switch on the rear panel of the amplier. e 866 was designed for years of operation in
this manner and no damage to the unit will occur.
5-24
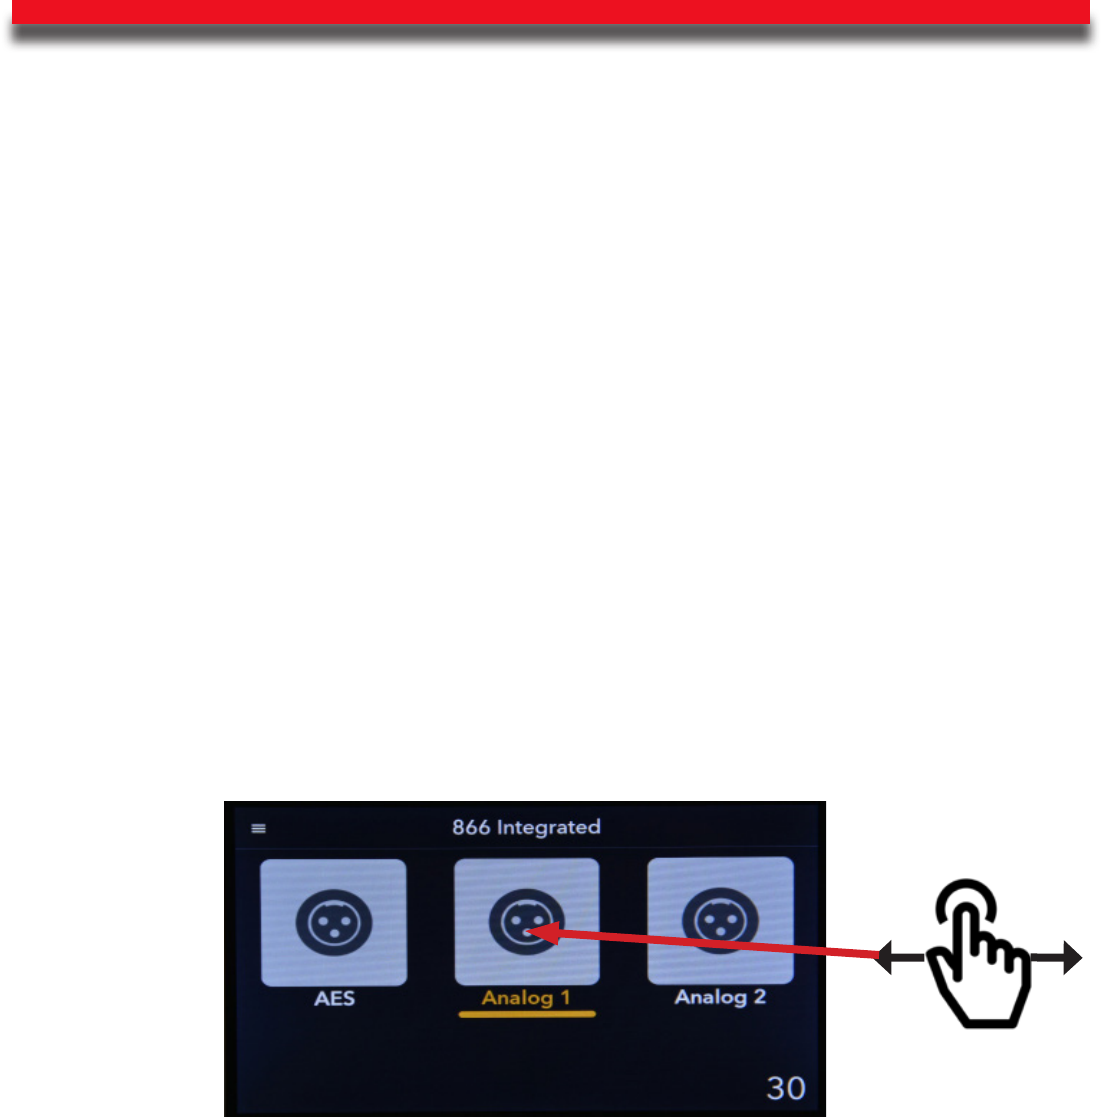
Touch-Screen Functions: Home Screen
Input Selection
e Analog + digital 866 has three analog inputs and multiple optional digital inputs. Each of
these inputs can be selected by pressing the display icon that corresponds with the input you
wish to select. You can scroll through the available inputs by swiping your ngertip le or right
across the input icons.
To select an input, touch one of the input icons on the front panel. e name of the selected
input will be shown as amber and underlined below the icon on the Home Screen display and
the input signal will be routed to the main outputs. For example, if analog 1 is chosen, “Analog
1” will show below the analog 1 icon.
If you wish to custom program an input, please see Input Settings on page 6-30.
NOTE: ere will be a slight delay when switching from one source to another. is is necessary to
allow the circuitry to adjust to the new input source and sync the app and front panel display.
5-25
Setup
Pressing the Setup icon will change the display from the Home Screen to the Setup Screen.
When the Setup Screen is shown, the setup menu will be shown and additional features can be
accessed by touching each item in the menu.
To access Setup options that may not be visible when options are open, use the up and down
arrows on the front panel touch screen.
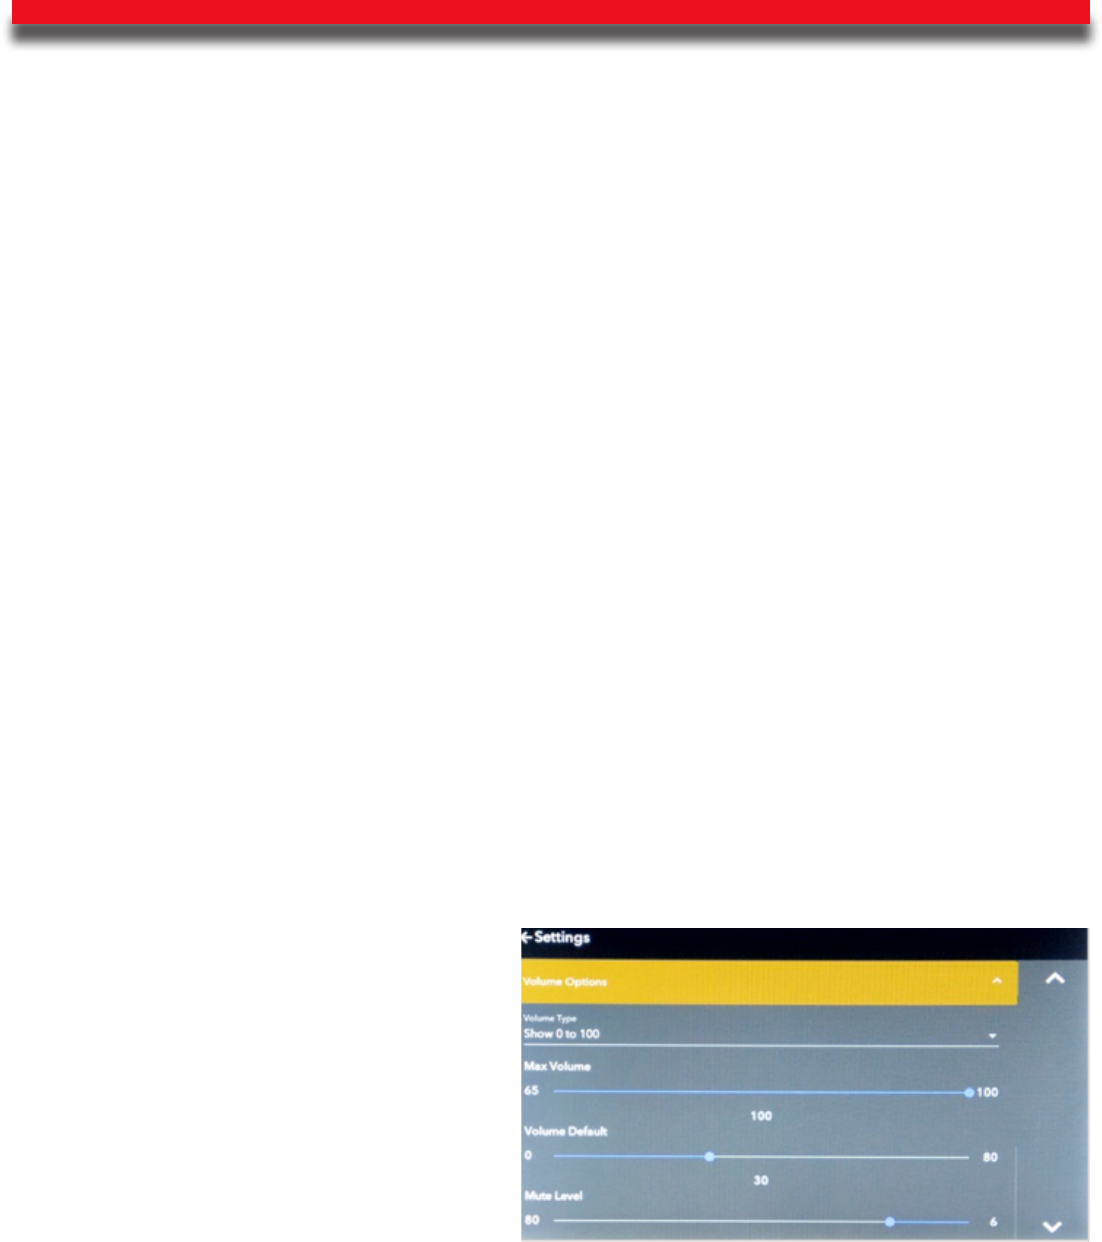
Volume Options
e Volume Options drop-down menu for the 866 can be accessed by touching the Volume
Options button on the front panel display. Four setup variables for the volume control can be
programmed: Volume Type, Max Volume, Volume Default, and Mute Level.
Volume Type
Volume Type refers to the way the volume is indicated on the front panel. ere are two
options for Volume Type: Show in decibels and Show 0 to 100.
Show in decibels will show the actual output of the 866 in 100 steps of decibel attenuation
from -100 (100 dB of attenuation from maximum output) to 0 (no attenuation from maximum
output). is is useful if you wish to know the actual level of attenuation for the 866 while it is
in use. Volume readings will be indicated by a negative number, for example -47. is indicates
47 decibels of attenuation from maximum
output.
Show 0 to 100 will show the volume in
100 equal steps from 0 (no output) to 100
(maximum output).
e factory default Volume Type setting for
the 866 is Show 0 to 100.
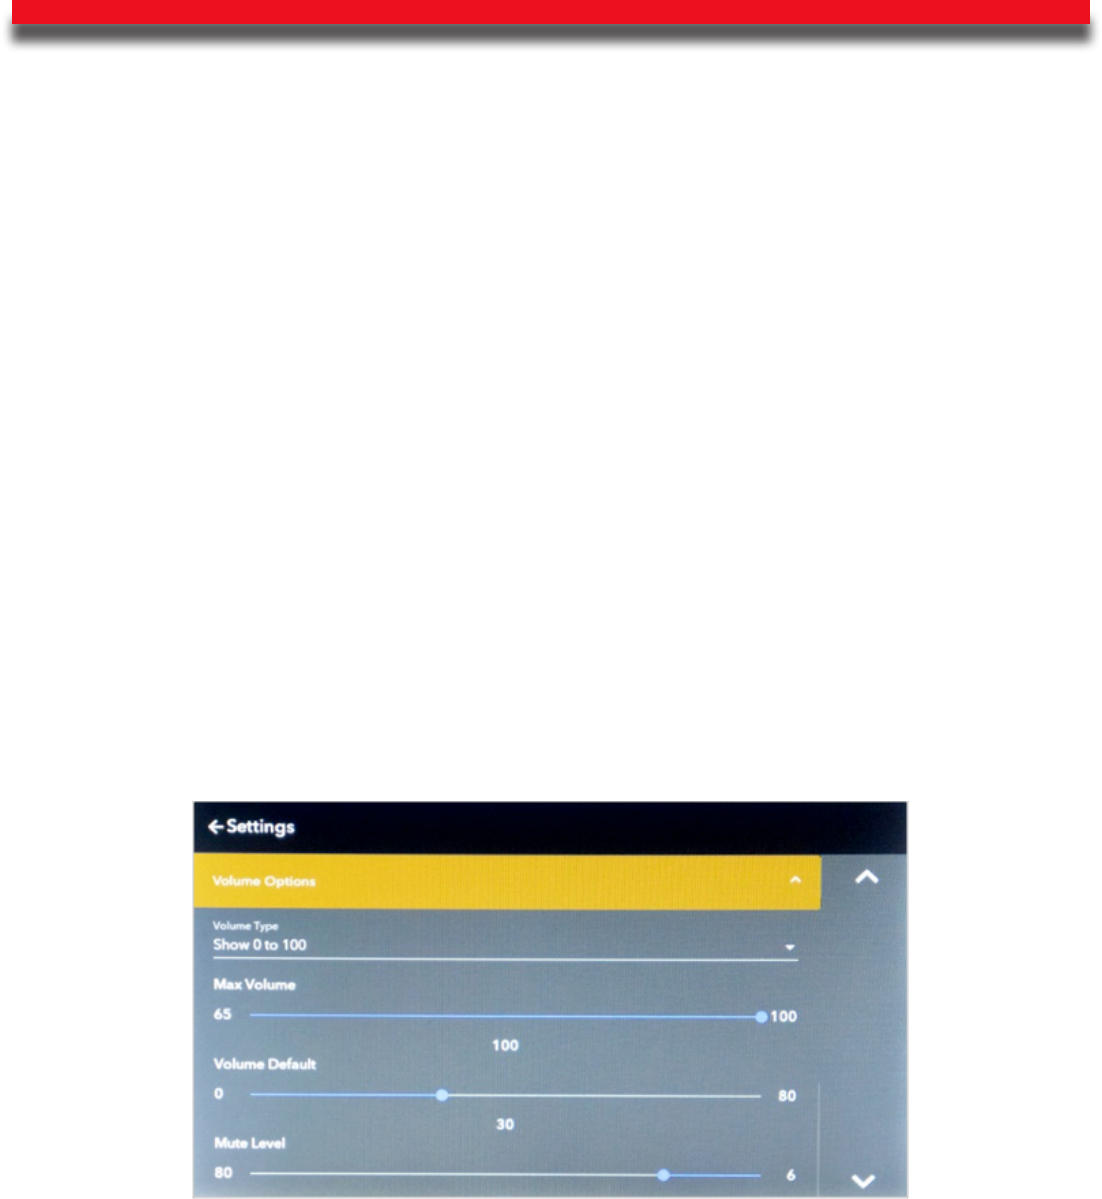
5-26
Max Volume
e Max Volume setting allows you to limit the maximum volume output setting. is is useful
if you have children who may press the volume buttons or if you wish to set a maximum level so
that it is not possible to damage your audio system by accidentally raising the volume to high.
To set the Max Volume level, touch the point on the Max Volume slider where you wish to set
the maximum allowable volume. e dot on the slider will then move to that point.
Touching the slider towards the right-hand end of the slider will set a higher maximum
allowable volume.
Touching the slider towards the le-hand end of the slider will set a lower maximum allowable
volume.
e number below the center of the slider indicates where the Max Volume adjustment is set.
e factory default Max Volume setting for the 866 is 100 or 0, depending on whether 0 to 100
or Show in Decibels is selected.

5-27
Mute Level
e volume of the 866 can be temporarily reduced when pressing the mute button or icon. e
Mute Level setting allows you to set the level of attenuation when the 866 is placed in Mute
mode, from a minimum of 6 dB of attenuation to a maximum of 80 dB of attenuation. For
example, you may prefer to have the volume set just low enough to carry on a conversation but
still have the music audible when the Mute function is engaged, or you may wish to have the
output nearly silenced when the Mute function is engaged.
To set the Mute Level, touch the point on the Mute Level slider for the number of volume steps
that you wish to have the volume drop when you press the Mute button. e dot on the slider
will then move to that point.
Touching the slider towards the right-hand end of the slider will set a higher Mute Level volume
setting.
Touching the slider towards the le-hand end will set a lower Mute Level setting.
Touching the slider at the farthest-le point will mean that the 866 will be nearly silent when
the Mute function is engaged.
e number below the center of the slider indicates the level of Mute Level attenuation.
e factory default Mute Level setting for the 866 is 20.
NOTE: e Volume function will continue
to work in Mute mode as long as the volume
is decreased. When in Mute mode, pressing
the Volume Down button will decrease the
volume setting even though the output will
remain muted. Pressing the Volume Up
button will immediately bring the 866 out of
Mute mode.
5-28
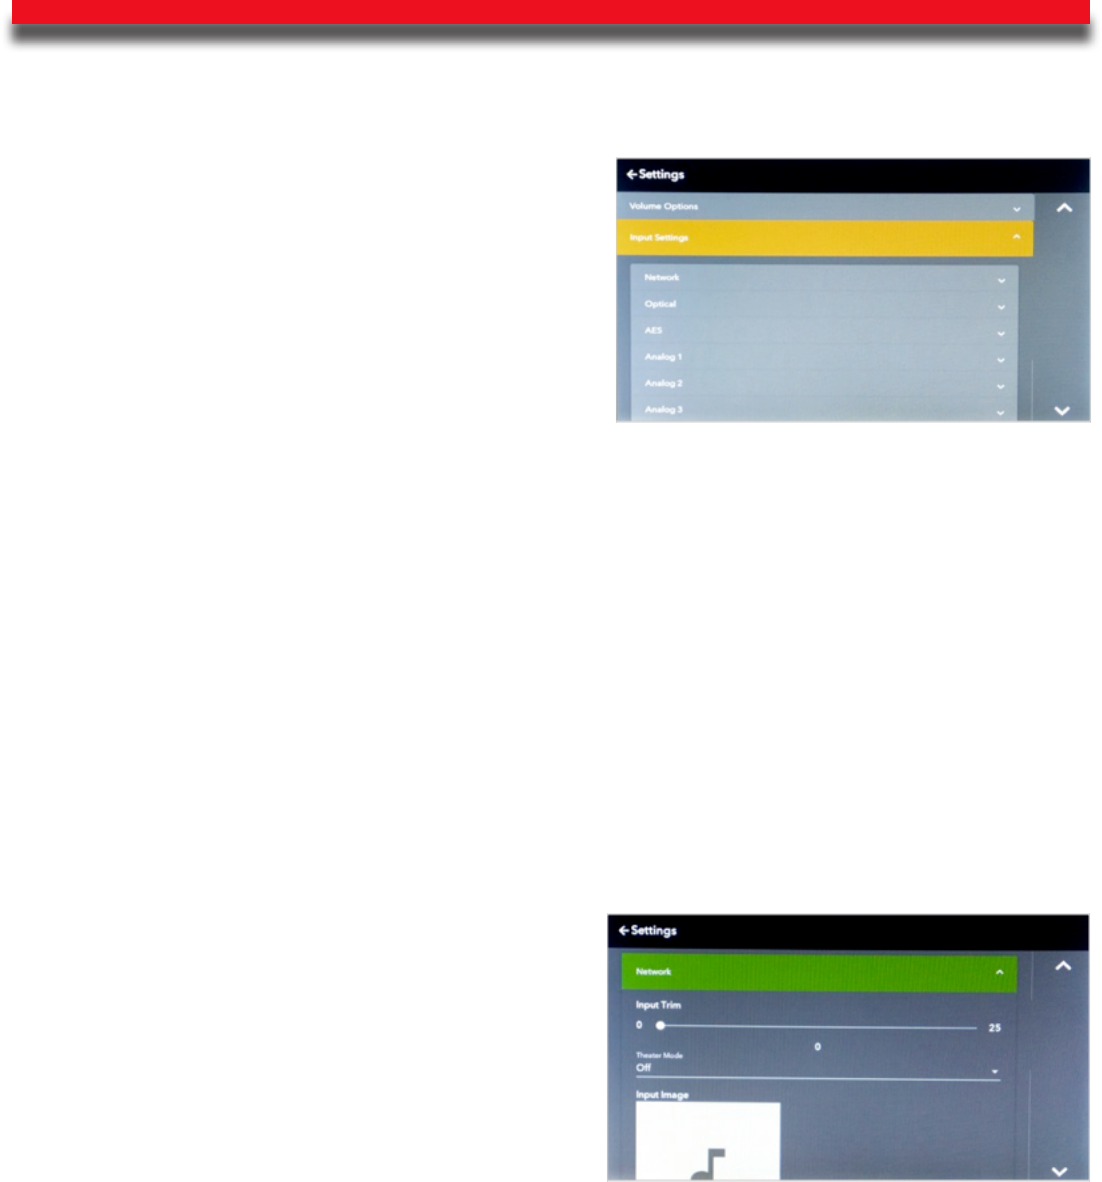
Input Settings
e Input Settings drop-down menu for the 866 can
be accessed by touching the Input Settings button on
the front panel display. Setup variables for three or six
inputs can be programmed, depending on whether
your 866 has analog-only or analog and digital inputs:
Network, Optical, AES, and Analog 1, 2, and 3.
Each input input can be adjusted for Input Trim,
eater Mode, and Input Image.
Input Trim
Any of the 866’s inputs can be programmed to unity gain. Input Trim allows you to reduce the
volume of a selected input relative to all others so that they can be matched to the same level.
For example, this can be useful when trying to match the level of a phono preamplier with
low output to a digital source with high output. e level can be trimmed so that there is no
dierence in output when switching between the two sources.
e level of Input Trim is indicated in dB (decibels). Trim level adjustments are made in -0.5 dB
steps for a total of -25.0 dB. e default trim level for each input is 0.0 dB.
Touching the slider towards the right-hand end of the slider will decrease the level of the
selected input relative to the other inputs.
Touching the slider towards the le-hand end will
increase the level of the selected input relative to the
other inputs.
e number below the center of the slider indicates
where the Input Trim adjustment is set.
e factory default Input Trim setting for the 866 is 0.
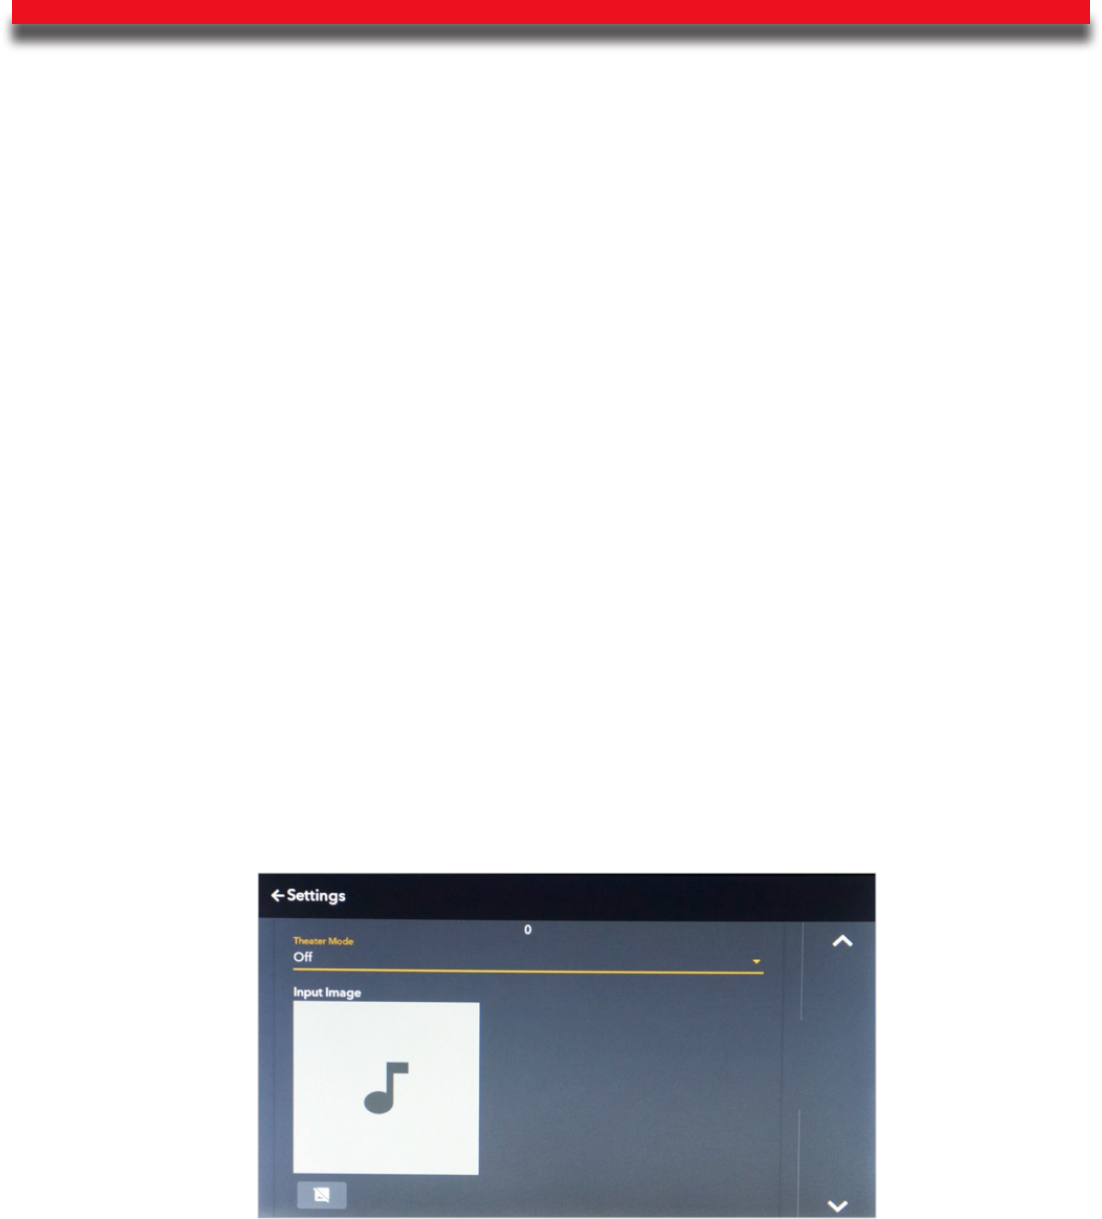
5-29
eater Mode
WARNING: eater Mode should be used with extreme caution, as there is no way to control
the volume of the 866 while in eater Mode! If it is programmed for an input that does not
have externally controlled volume, damage to speakers or other components may occur!
Any of the 866’s inputs can be programmed to the equvilant unity gain. is is called eater
Mode. e purpose of eater Mode is to allow the 866 to be used in home cinema systems
where the master volume control will be in the surround sound processor. When an input has
been programmed for eater Mode, the volume controls will be disabled and the volume level
must be controlled by the surround sound processor. Unity gain volume level will be shown by
the front panel Volume indicator.
To set an input to eater Mode, touch the eater Mode Slider and a drop-down list showing
“On” or “O” will appear. Touch the On selection. e input will now be set to the equivilant of
unity gain or eater Mode. (95 on the 0-100 scale, and -5 on the decibls scale)
To return the input to normal operation, touch the eater Mode Slider and a drop-down list
showing “On” or “O ” will appear. Touch the O selection. e input will now be set to normal
operation.
e factory default eater Mode setting for the 866 is O.
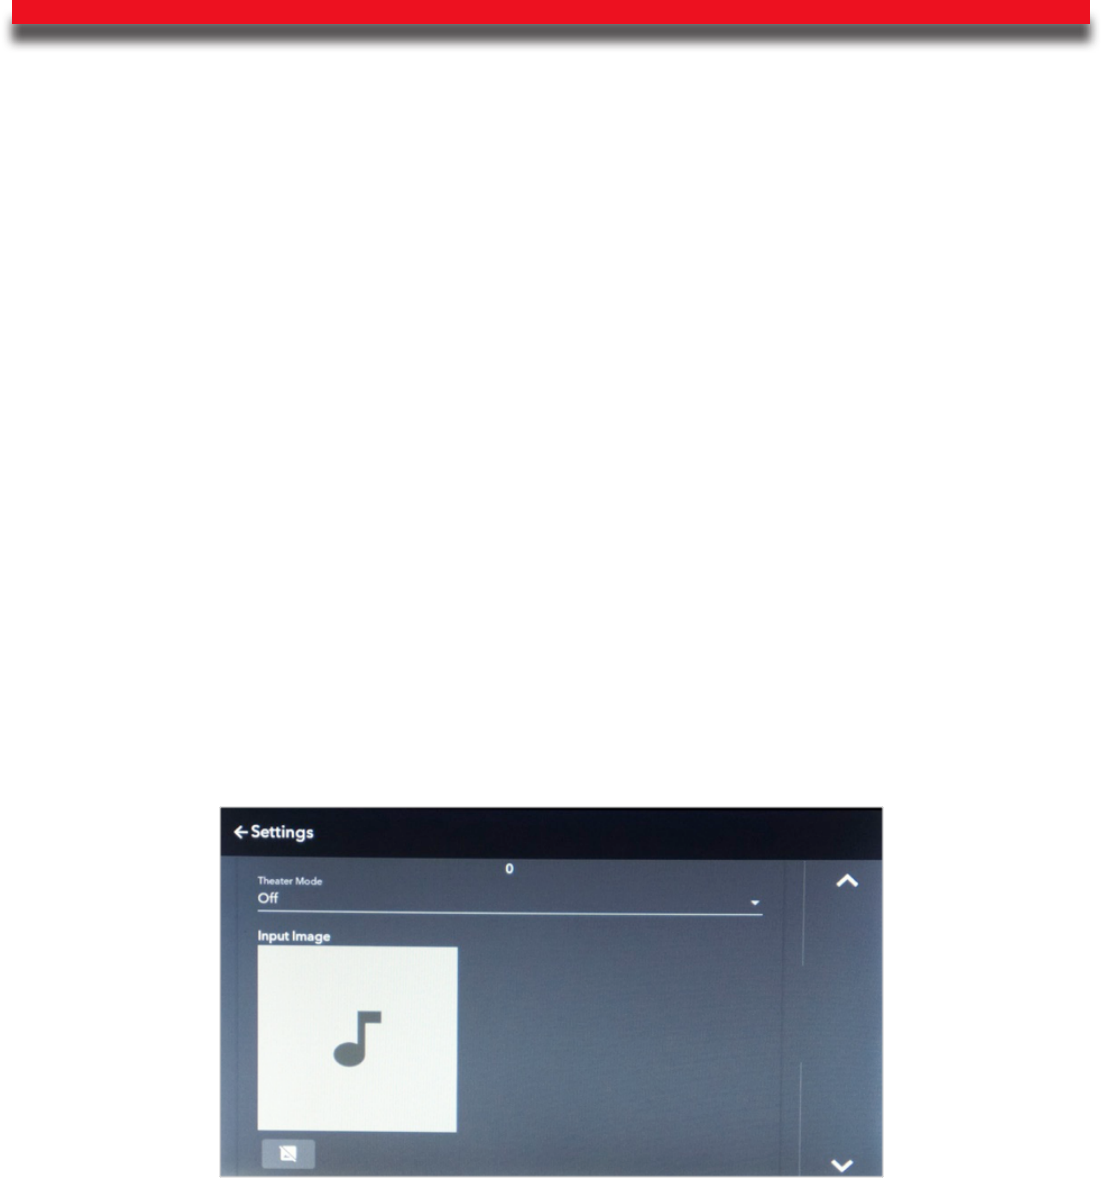
5-30
Input Image
Custom images can be programmed for each input using the Boulder Control app and a mobile
device with a camera. For example, you may wish to insert a photo of your turntable for an
analog input icon on the front panel. e Input Image indicator will show this image if it has
been loaded from the Boulder Control app. If no image has been loaded, a generic icon will be
shown.
Directly below the input image is the Clear Image button. To clear the input image, press this
button. is will delete the input image and return the input icon to the factory default.
You must use the Boulder Control app to install input images. is cannot be accomplished by
the 866 alone.
NOTE: If the input image has been cleared, it cannot be recovered from the front panel settings.
e image must be reloaded or a new image must be loaded from the Boulder app.
NOTE: We reccomend using an Android device for taking photos. is is because with Apple
products even the lowest resolution for images can slow down the input switching operation. e
more photos the more likely it will slow input switching.
5-31
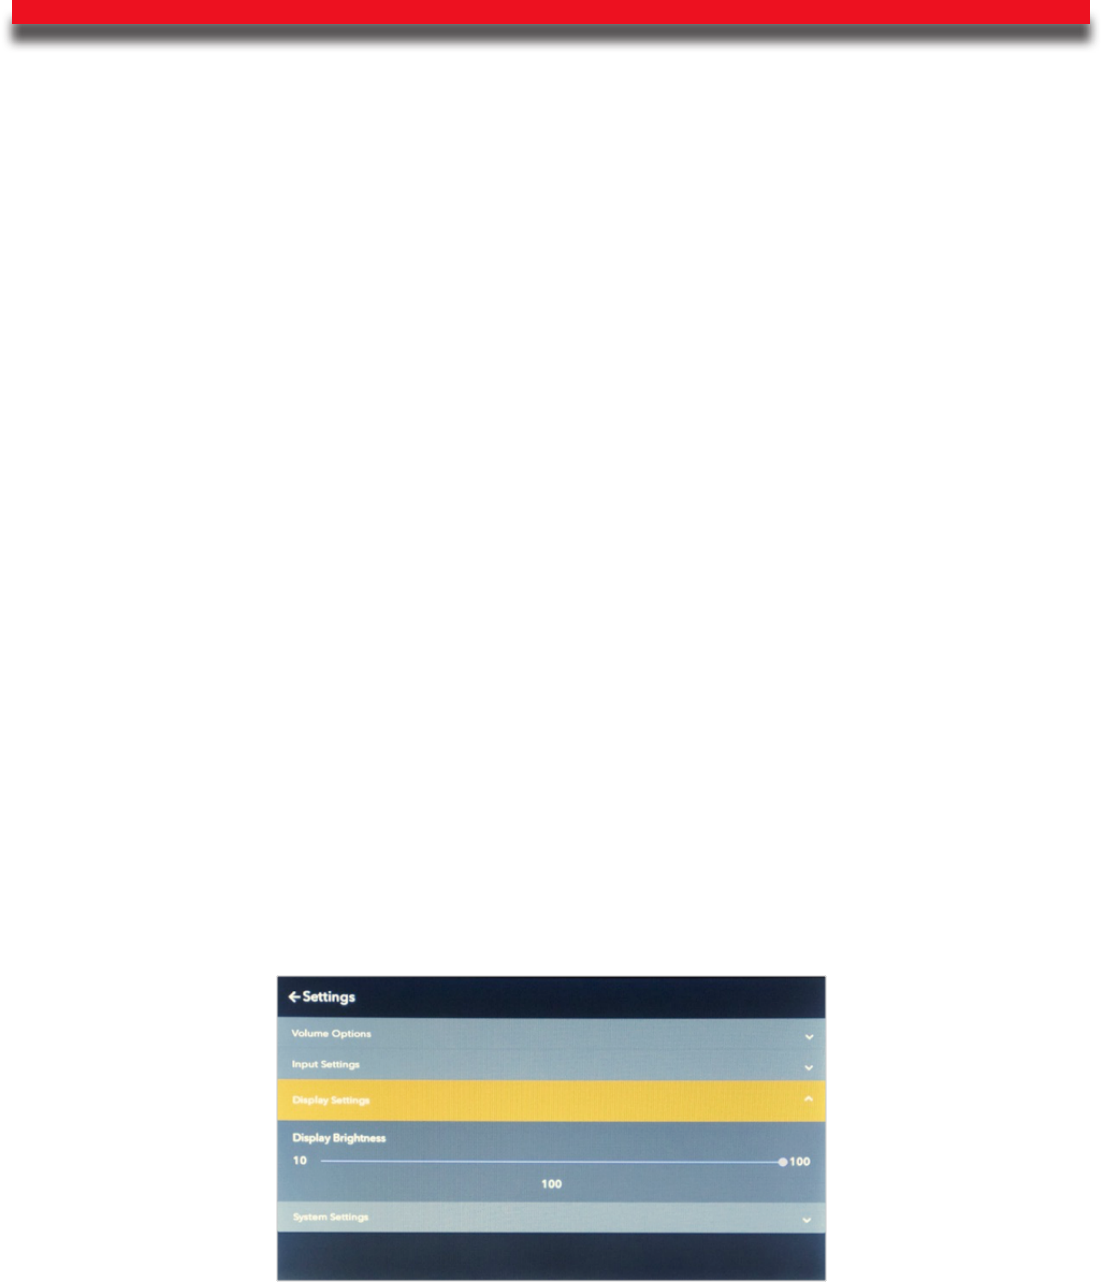
Display Settings
e Display Settings drop-down menu for the 866 can be accessed by touching the Display
Settings button on the front panel display.
e brightness of the display can be adjusted. e Display Settings determines the brightness of
the display, from 10% (minimum brightness) to 100% (full brightness).
e number on the slider indicates the display’s brightness as a percentage of maximum. For
example, a setting of “75” indicates the display’s brightness is 75% of maximum.
When the brightness is set to low levels, the screen will temporarily go to a slightly brighter
setting for ve seconds when any button on the front panel or the Boulder Control app is
pressed. e display will then return to the desired brightness. is ensures that if a function is
changed, it will be noticed whether intentional or not.
Touching the slider towards the right-hand end of the slider will increase the brightness of the
866’s front panel display.
Touching the slider towards the le-hand end will decrease the brightness of the 866’s front
panel display.
e factory default Display Brightness setting for the 866 is 100.
NOTE: e front panel display can only be turned 90% o and cannot be completely turned o.
ere is no comprimise in preformance from having the display on.

5-32
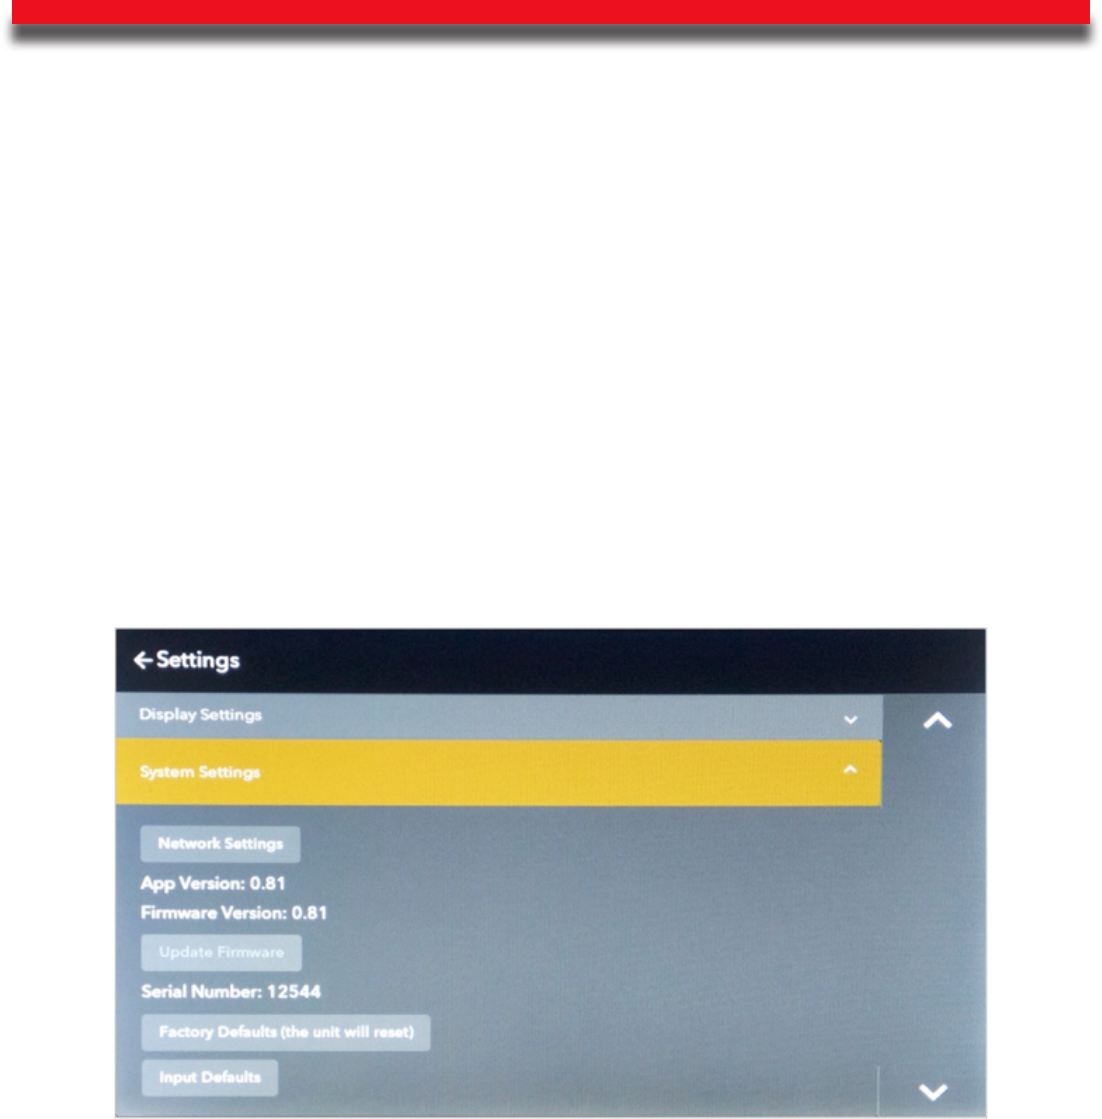
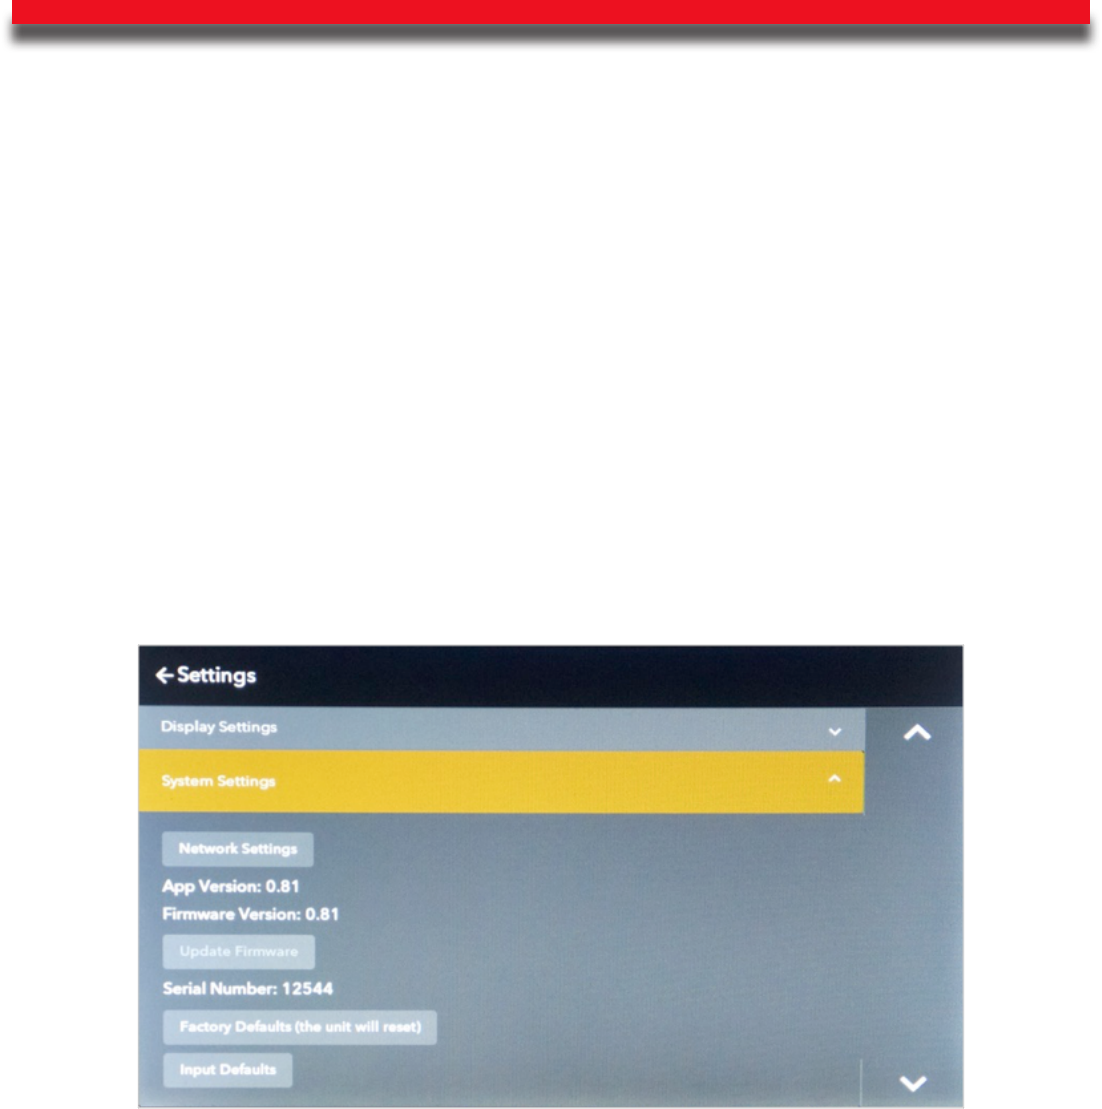
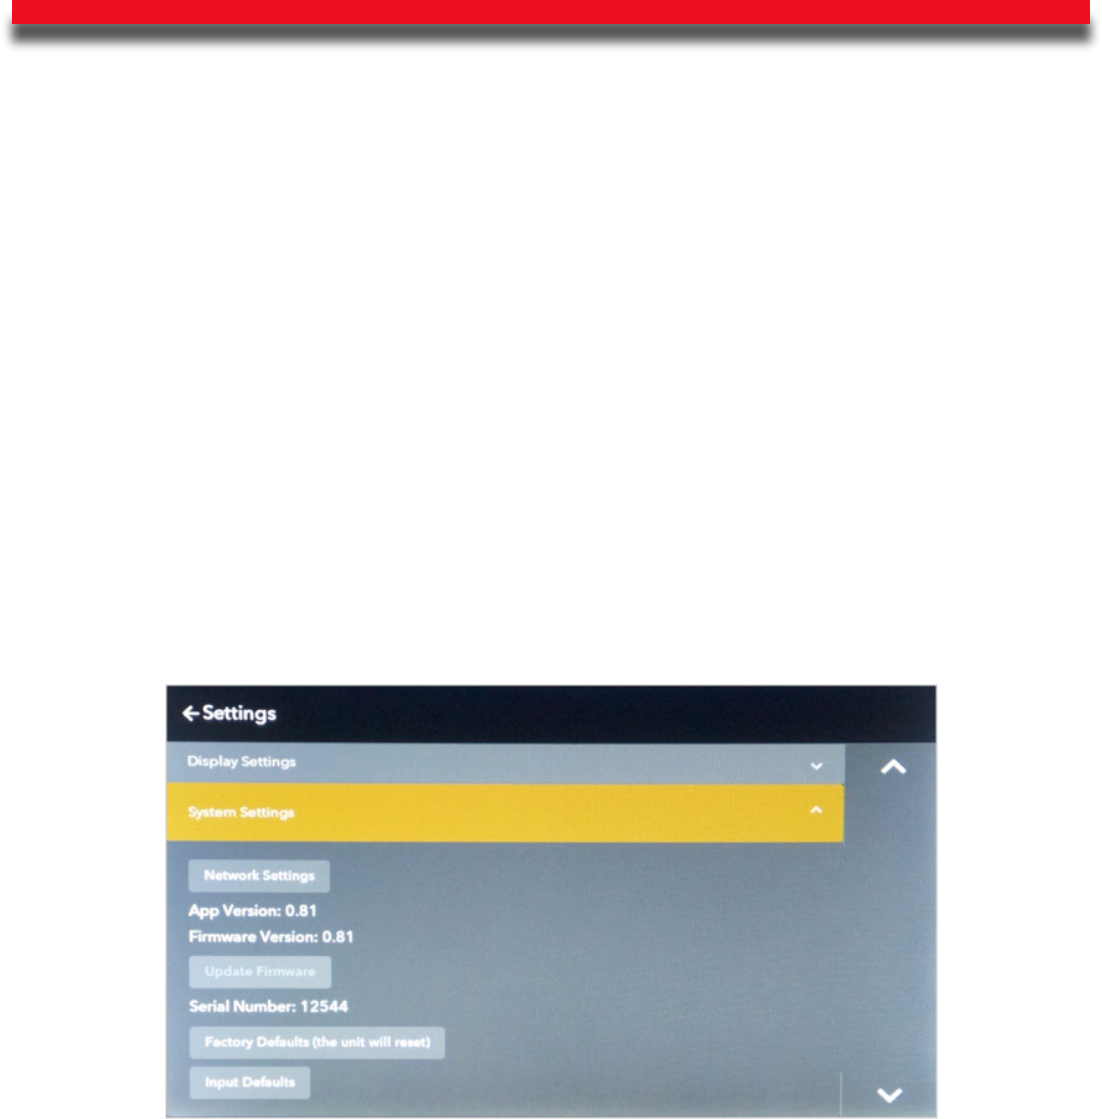
System Settings
e System Settings drop-down menu for the 866 can be accessed by touching the System
Settings button on the front panel display. e System Settings are used to adjust or monitor all
of the internal functions of the 866. e following settings can be checked or adjusted from the
System Settings menu: Network Settings, App Version, Firmware Version, Update Firmware,
Serial Number, Reset Factory Defaults, and Reset Input Defaults.
Network Settings
e Network Settings menu will provide you with all network information for the 866 as well as
allow you to connect to a wireless network.
e following network information is displayed in the Network Settings menu:
MAC Address:
Network Address:
SSID: BoulderAmpliers-(serial number)
e following buttons are also present in the Network Settings menu: Proof of Possession and
Restore Wi Defaults.
Proof of Possession is necessary to connect the 866 to a wireless WiFi network. To connect the
866 to a wireless WiFi network.
Restore WiFi Defaults will erase all memorized WiFi passwords and networks. e Restore
WiFi Defaults functions should always be used when the 866 will be moved to a new location
with a dierent network or when possession of the unit will transfer.
5-33
App Version:
e App Version indicator shows the revision of the 866’s front panel control soware.
Firmware Version:
e Firmware Version indicator shows the revision of the 866’s main operating soware.
Serial Number:
e 866’s serial number will be displayed here.
5-34
Factory Defaults
e Factory Defaults button will restore all parameters of the 866 to the original factory
settings, including all custom settings and programmed functions.
When the Factory Defaults button is pressed, a pop-up window will appear on the 866’s front
panel display that will ask, “Are you sure you wish to set Factory Defaults (the unit will
reset)?”
If you wish to restore the Factor Defaults, press the Yes button. A new pop-up window will
appear on the front panel display that will notify you that the unit is resetting. Aer a short time,
the 866 will reboot and all options will be returned to their original factory settings.
If you do not wish to restore the Factory Defaults, press the No button.
5-35
Input Defaults
e Input Defaults button will return all input option settings, including input icon photos, to
their original factory settings only but will not change any of the other optional settings for the
unit.
If you wish to restore the Input Defaults, press the Ye s button. A new pop-up window will appear
on the front panel display that will ask, “Are you sure you wish to set the Input Defaults?” To
reset the 866’s inputs to their original factory settings, press the Yes button.
If you do not wish to restore the Input Defaults, press the No button.

5-36
Updating the Firmware of the 866
You can update the rmware of the 866 Via ethernet on input homescreen.
To update the 866 using ethernet rst you must make sure the ethernet cable is connected and
the unit is turned o or in standby.
Once the unit is on and out of standby and there is an update available, a green clock logo will
appear in the top right corner of the 866’s display.
If you press the clock logo, it will prompt you to update. Once conrmed the update will begin.
NOTE: If the 866 is connected to ethernet and there is an update available but there is no clock in
the top right of the display: Go into the settings of the 866. Under system settings there is a button
to update rmware. Once the button is pressed an update will begin.
NOTE: If you live in an area without internet, polietly ask your dealer to send a USB stick that has
the update. Once the USB is inserted into the back of the 866, the green clock logo will appear in
the top right corner should appear to prompt you for an update.
Note: Aer an update is completed, it is good practice to reset the unit. To do this turn the 866 o
from the rear switch. Aer 10-15 seconds turn the unit back on.
If you are having issues getting your 866 to update contact your local dealer.

5-37
What is Roon?
Roon is a subscription based music streaming platform and app. at takes music from other
streaming platforms such as Tidal and Apple Music and combines it with your own personal
library to play through one app. It organizes and renes your music les making it easy for the
listener to enjoy their entire library of music from one device. e music quality is top notch
and has a bit perfect play back of lossy and lossless les including DSD and PCM. It creates a
personalized listening experiance and a pathway to to nd new music with an interface that is
built around the listener and easy to use.
Connecting to Roon on 866
Firstly, download the Roon app to your mobile device, tablet or laptop.
Once installed and the setup for Roon is complete, open the app.
Look to the bottom right of the screen on the playback bar and make sure the “Zone” (what
Roon will play through) is selected on your 866. If unnamed it will show your 866’s serial
number.
Once your zone is selected on your 866, hit the music you want to listen to, press play and enjoy.
Using Boulder Control App with Roon
Connecting your device to the Boulder Control app while using Roon means you have full
control of the functions of the 866 from your mobile device and allowing you to navigate Roon
as a control point. (See page 5-15 /5-16 on how to connect to Boulder Control app)

5-38
What is UPnP?
UPnP stands for universal plug and play which is a streaming funtion that enables the user to
stream and access media from their home network to their devices through a control point.
How to U
se UPnP with the 866
On your network or NAS, where your music resides you can use the Boulder Control app or a
3rd party UPnP app such as M-Connect, Bubble UPnP, JRiver to stream music through the 866.
UpnP can also be used with self powered USB-A type connectors.
To begin UPnP playback use your preered app (control point) to connect to the 866.
Use the control point to browse your library, once a song is selected the 866 will automatically
switch to the Network input regardless to what input the 866 was on and start playing the song
that was selected.
Once the music starts playing the display will show metadata, album artwork, which server is
being played and navigation options. Such as play/pause, skip forward, skip backwards.
Air-Play Functionality
If you have an Apple product, access Air-Play on your mobile device and select your 866. Once
you see the 866 is selected you should be able to play audio to the 866.
If you have an Android device there are apps that will allow for Airplay use, there are many
apps such as, AirMusic, Double Twist or All Cast.
Airplay input is hidden it will automatically select once you start playing music.

6-39
Web Based Programming
ough it is not necessary to use any of the web based programming functions, you may nd
them helpful in setting up and personalizing your 866.
All web based programming is accomplished by accessing the 866 HTML page while the unit is
powered up and connected to a live computer network. Once the page is accessed, the various
programming functions can be viewed, changed, and saved.
To access the 866’s HTML page, you will need a computer that is connected to the same network
as the 866 to enter the 866’s network address into a web browser.
To nd the 866’s network address, press the Setup icon on the front panel, then press the System
Settings button in the Settings menu, followed by the Network Settings button. You will see a
list of information about the 866, including:
MAC Address:
Network Address:
SSID: BoulderAmpliers-(serial number)
Network Address: If the 866 is attached to an active network, the network address of the unit
will be indicated here. is number should be entered in the address bar of a web browser
to access the 866’s web based programming page. e HTML page will then load onto your
computer.

6-40
Boulder Net
is is helpful to system integrators who are using Boulder products in integrated systems.
Boulder Net is a control system unique to modern Boulder products. For detailed information
about Boulder Net, please consult your authorized Boulder dealer or see the Boulder Net
manual. Further information can also be found at www.boulderamp.com.

7-41
Technical Specications
Continuous Power, 8 Ohms 200W
Peak Power, 8 Ohms 250W
Continuous Power, 4 Ohms 400W
Peak Power, 4 Ohms 400W
Peak Power, 2 Ohms 700W
Balanced Analog Inputs 3 pairs balanced analog via 3-pin XLR
Optional Digital Inputs Ethernet, USB-A x 4, Toslink, AES3
Outputs 0.25” (6 mm) binding posts
Distortion, THD 0.01%
Equivalent Input Noise (EIN), 20 kHz 2 μV
Input Impedance 100kΩ Balanced
Frequency Response, 20 Hz to 20 kHz +0.00, -0.04 dB
Frequency Response, -3 dB 0.015 Hz & 150 kHz
Maximum Analog Gain 40.4 dB
Volume Range 100 dB
Volume Steps, 1.0 dB ± 0.01 dB
Power Requirements 100V, 120V, 240V, 50 - 60 Hz (country
specic congured)
Power Consumption 1000W Maximum
Note: All measurments taken at 120V

7-42
Weights and Dimensions
866 Integrated Chassis: 17” W x 15.4” D x 7.25” H
(54 lbs.)
44 cm W x 39 cm D x 19 cm H
(24.5 kg)
Shipping: 24” W x 23” D x 14” H
(64 lbs.)
61 cm W x 59 cm H x 36 cm H
(29 kg)
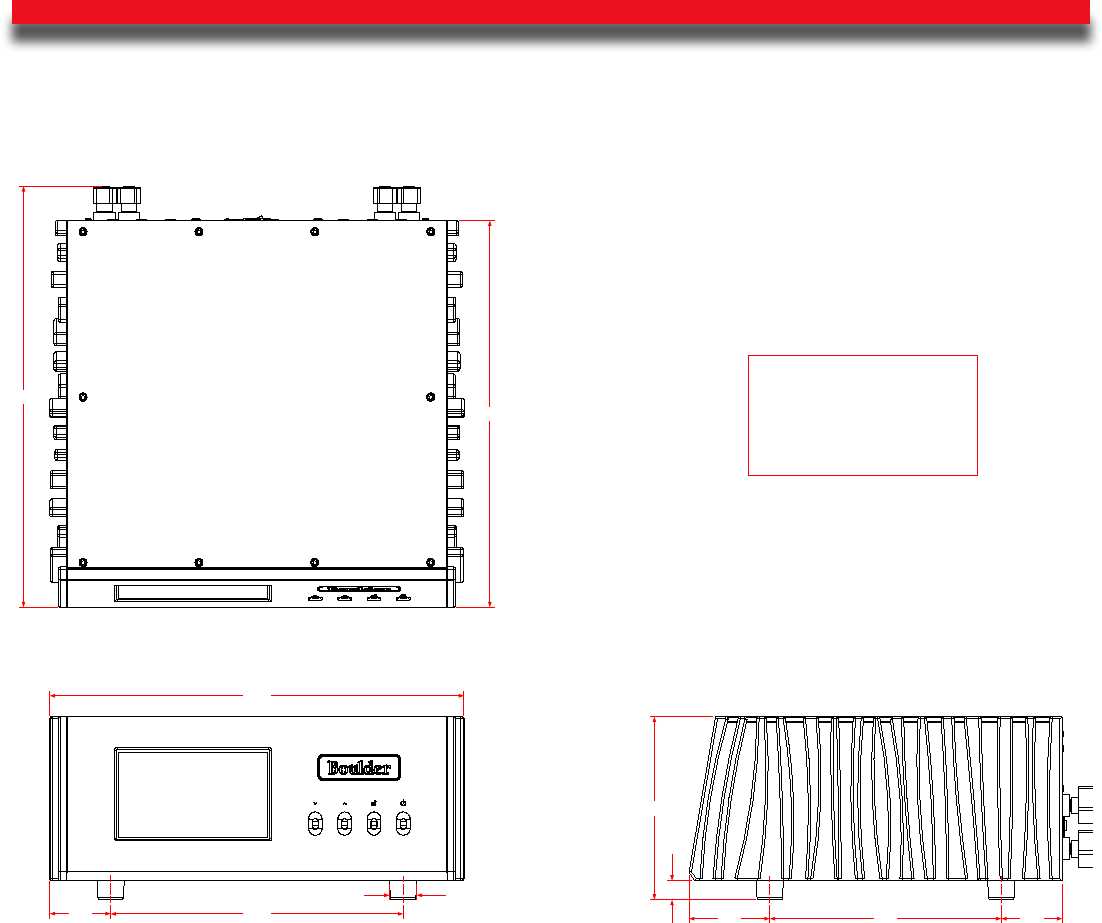
7-43
866 Integrated Dimensions
17.000
12.000
2.500
1.112
15.313
16.670
7.250
.750
3.313
9.500 2.500
BOULDER
866 INTEGRATED
DIMENSIONS
7-44
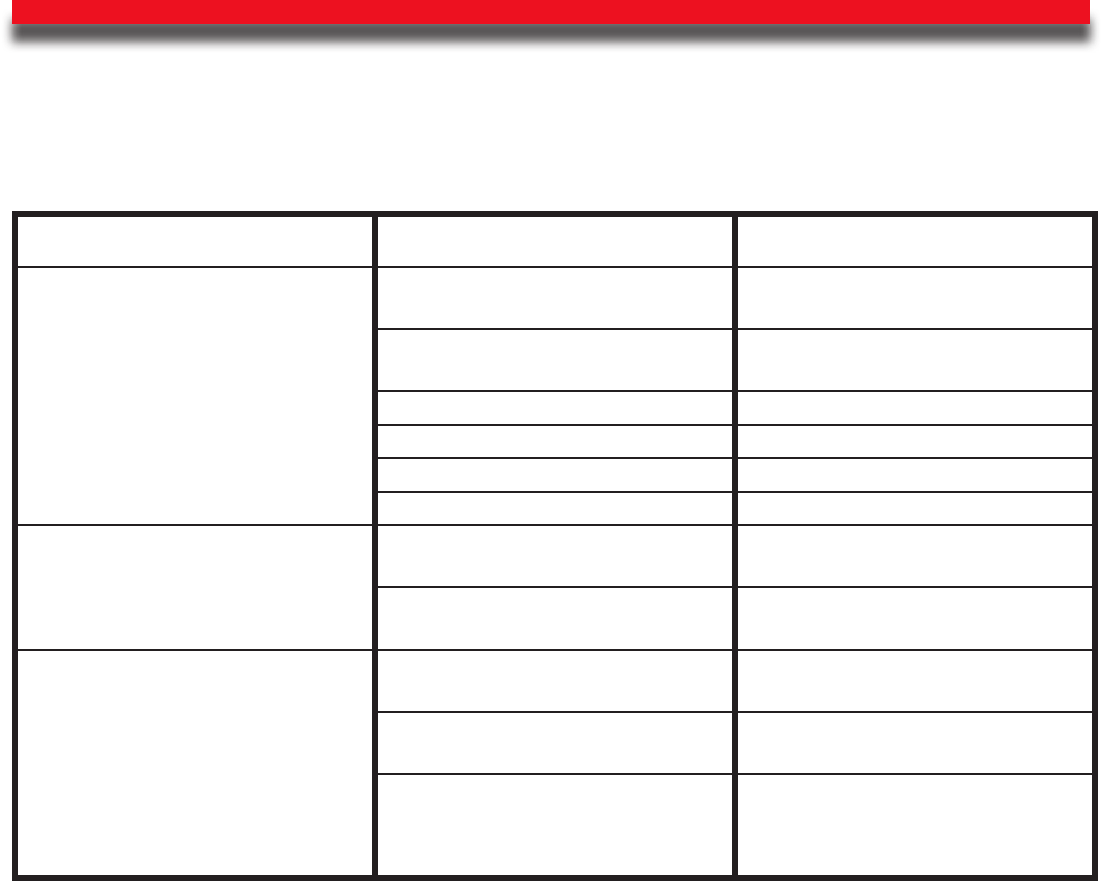
Troubleshooting
Sympton Cause Remedy
No Power Indication
Master AC Power Switch on rear
panel is not ON
Turn on Master AC Power Switch
Amplier is not plugged in Connect power cord to AC mains
outlet
Amplier circuit breaker is tripped Reset amplier circuit breaker
Home circuit breaker is tripped Reset home circuit breaker
Low line voltage Have line voltage checked
Defective power cable Have power cable tested or replaced
Power Indication but No Sound
From One
Channel
No signal from one channel of
source
Check source controls, cables and
connection
No signal out of amplier Check cables and connections from
amplier
No Response to App
Amplier is not connected to
network
Connect amplier to network
Mobile device is on a dierent
network than amplier
Connect amplier and mobile
device to the same network
Amplier is unable to receive WiFi
signals
Move amplier to a better location
or use wired network connection

7-45
Notes:
